Tag Archives: Data Migration

#Azure : Azure Data Factory


Azure provides many options for data ingestion and Azure data factory is one of them. It is an option for scenarios where you need to transfer data regularly or in technical terms it is cloud data integration service known as data pipeline. Azure data factory works on two key pillars, i.e. data movement and data transformation. This cloud based data integration service allows to create data-driven workflows and orchestration/automation of the data movement and transformation processes.

Courtesy: Microsoft

Let me explain you this through one scenario:

One of the super market is going through the transformation and looking for ways to increase the revenue and customer satisfaction. Many stores are doing well in terms of revenue and customer satisfaction while few stores are struggling to achieve the same. Business has decided to close few existing stores and open new stores in new locations as well. Super market stores capture the customer satisfaction by a survey machines installed on each PoS system. When customer makes the payment, cashier request them to provide a feedback. This feedback system runs on cloud-native app and store the data directly to the cloud in synchronous mode. This organization wants to analyze userbase based on the demographics. All the billing related data is being stored in ERP system that resides in on-premises datacenter.

Strategy team has provided an approach to generate and visualize useful data for new markets. To fulfill this need, you need to consolidate all the data in one place and because of the continuity, it is not one-time job as they need to compare data based on the days, weeks, month, year, time and season wise. With Azure Data Factory you can move your data continuously using data pipeline, and once data has been moved there then you can first transform this data based on the need and later use this data with any systems or use analytics tools like Power BI to visualize the data. Here is the process, which differs between version 1 and 2.

Azure Data Factory v1:

Azure Data Factory v2:

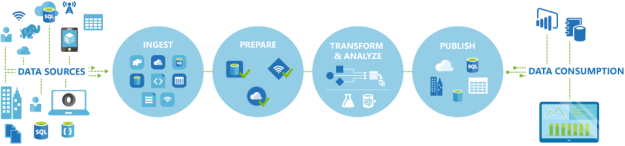
Now let’s understand the process in detail:

Connect & Collect: Whenever you need to play with data, first you need to collect it. In layman language, you can copy the data from multiple sources in different ways such as using some copy utility, FTP/SFTP, scripts etc. This data can be in multiple forms such as structured, un-structured and semi-structured, and can be extracted from multiple sources such as on-premises, SaaS solutions, database, file shares etc. Once you have multiple data sources, frequency and availability of data will also differ. Azure data factory can connect to multiple data sources and collect the data into the centralized data store such as Azure Blob Storage or Azure data lake store etc.

Transform & Enrich: Once the raw data has been collected, you can transform the data using compute services such as HDInsight Hadoop, Spark, Data Lake Analytics and Machine Learning.

Publish: Once you have transformed the data now you can use this valuable data anywhere in the cloud or can send back this data to on-premises as well. This data can be used by any analytics tool such as Power BI to visualize and generate the reports or can be loaded into the Azure Data Warehouse, Azure SQL Database, Azure cosmoDB or anywhere else for further use.

Monitor: Azure Data Factory v2 provides the monitoring capabilities to monitor established data integration pipelines for various purposes. You can leverage built-in support for pipeline monition via PowerShell, log analytics, Azure monitor, API and health panels on the Azure portal.

At present, Azure Data Factory is available in selected regions only. ADF v1 is available in East US, East US2, West US, West Central US and North Europe region while ADF v2 is available in East US, East US2, West US, West Central US, North Europe and West Europe regions. However, a data factory can use compute resources and data stores from other regions as well. Therefore, you can use this service by leveraging ADF from selected regions.

Azure Data Factory pricing can be calculated based on the four parameters:

  • Number of activities run.
  • Volume of data moved.
  • SQL Server Integration Services (SSIS) compute hours.
  • Whether a pipeline is active or not.

You can calculate your pricing here.

At present, Azure Data Factory version 2 is in preview.

#Azure: Azure Data Box (Preview)


Microsoft Azure Data Box is the best service to migrate large amount of data to Microsoft Azure storage. For small to medium size of cold data you can use Azcopy and Azure Import/Export service. Data Box is more secure than Azure Import/Export because it provides end-to-end data migration capabilities with the help of partners.

Let me explain you about Azure Data Box through visualization.

This service can be easily requested from Azure portal. Here is how it work:

  1. Request for Azure Data Box service through Azure portal
  2. Microsoft ships it to your address
  3. You receive, connect and fill the data
  4. You return it to the Microsoft
  5. Microsoft upload the data based on your requirements
  6. Microsoft erase the Data Box and wipe it as per NIST SP 800-88r1 standards

It is very fast process and doesn’t waste your time. You get only 10 days of time by default to copy your data to the Azure Data Box. These 10 days exclude the day you receive and the day carrier scans your package. For any reason, you couldn’t copy your data within 10 days then you need to pay fee extra on the daily basis. Here is a pricing details (Courtesy: Microsoft) for one full round-trip of this service:

SERVICE UNIT PREVIEW (US) PRICE (Europe)
Device Standard Shipping 1 Package $95 $113
Import Service FeePREVIEW 1 Unit $125 $125
Extra Day FeePREVIEW 1 Day $7.50 $7.50

If this device is lost or damaged due to any reason, you will have to pay USD $40,000 as a recovery cost. At present this service is in preview and the above pricing is only applicable to preview and may change any point of time. Here is the list of Azure regions, where this service is available at present (31/May/2018).

Location Azure Regions
United States Central US, East US, East US2, North Central US, South Central US, West Central US, West US, West US2
Europe North Europe, South Europe

Now, look at the list of Azure partners for this service.

All these details are applicable to preview and may change at the time of GA.

#Azure: Step by step Azure Import/Export service


In my preceding blogpost I had covered Azure Import/Export service concept and requirements. In this post let me explain how to do it step by step.

First look at the Azure import service.

  1. Look at the data that you need to migrate, and note down the capacity, number of drives required, data type and destination blob location in Microsoft Azure.
  2. Procure and prepare the drives using WAImportExport tool and bitlocker. WAImportExport tool to copy the data and bitlocker to encrypt the data.
  3. Create an import job through Azure portal and upload the journal file created be WAImportExport tool. Journal file is created for each drive that contains drive ID and bitlocker key.
    1. Login to the Azure portal and search for import/export service.

    2. In the Import/Export jobs panel, select “create import/export job” to initiate a new job request.

    3. Fill the basic configuration details as needed.

    4. In job details panel, upload the journal files, select destination storage account.

    5. Drop-off location will be selected by default based on your storage account location and click on OK.

    6. Fill the return shipping information and verify the summary to create a job successfully.
  4. Ship the drives to the shipping address as described in summary page.

  5. Update the delivery tracking number in your import job details and submit the import job.
  6. Once drives received, will be processed in the Azure datacenter.
  7. Drives will be returned to you once import completed based on the return address provided.

Here is the graphical representation of the above process.

Courtesy: Microsoft

Now, look at the Azure export service.

  1. Look at the data that you need to export from Azure storage account, and note down the capacity, number of drives required, data type and destination location.
  2. Procure the number of drives that you need to export data from storage account.
  3. Create an export job through Azure portal.
    1. Login to the Azure portal and search for import/export service.

    2. In the Import/Export jobs panel, select “create import/export job” to initiate a new job request.

    3. Fill the basic configuration details as needed.

    4. In job details panel, select the source storage account.

    5. Drop-off location will be selected by default based on your storage account location, select required export option and click on OK.

    6. Fill the return shipping information.

    7. verify the summary and click on OK to create the job successfully.

  4. Ship the drives to the shipping address as described in summary page.

  5. Update the delivery tracking number in your import job details and submit the export job.
  6. Once drives received, will be processed in the Azure datacenter.
  7. The drives will be encrypted by bitlocker and keys will be provided to you via Azure portal.
  8. Drives will be returned to you once import completed based on the return address provided.

Here is the graphical representation of the above process.

Courtesy: Microsoft

I hope, this blogpost helped you with Azure Import//Export job. Please share your feedback in comments section.

#Azure: Azure Import/Export service


Azure Import/Export service allows data transfer between Azure datacenters and customer locations. It is a secure service to send or receive medium-to-large amount of data when the bandwidth becomes bottleneck and costly. Azcopy is preferred tool for online data migration if you look Microsoft Azure data transfer options. While Azure Import/Export provides large amount of physical data transfer in secure and reliable manner. The data can be copied in one or more drives to import to and to export from Azure blob and file storages.

This Import/Export service use either 2.5-inch SSDs or 2.5/3.5-inch SATA II & III HDDs or mix of these. External HDD with built-in USB adapter and drives in external casing are not supported. Here is the quick snapshot of possible import and export data transfers.

Job Storage Accounts Supported Not Supported
Import Classic

Blob Storage accounts

General Purpose v1 storage accounts.

Azure Blob storage.

Block/page blobs.

Azure File storage.

Export Classic

Blob Storage accounts

General Purpose v1 storage accounts.

Azure Blob storage.

Block, page and append blobs.

Azure File storage.

Points to remember while sending drives for import job.

  • A maximum of 10 drives for each job.
  • Use only single data volume partition.
  • Data volume must be formatted with NTFS.
  • Supported external USB adaptors to copy data to internal HDDs.
    • Anker 68UPSATAA-02BU
    • Anker 68UPSHHDS-BU
    • Startech SATADOCK22UE
    • Orico 6628SUS3-C-BK (6628 Series)
    • Thermaltake BlacX Hot-Swap SATA External Hard Drive Docking Station (USB 2.0 & eSATA)

Let me explain you use cases and process to perform import/export job.

You can use this service in following scenarios:

  • Move data to the cloud as part of the data migration strategy.
  • Data backup to the cloud.
  • Data recovery from the cloud.
  • Data distribution to the customer sites.

Here is the high-level process and components and locations available for Import/Export job.

Components:

  • Import/Export service in Azure portal to create a new job
  • Hard disk drives to copy the data
  • WAImportExport tool to prepare drives and encrypt data

Location available on the date of writing this blog post:

Country Country Country Country
East US North Europe Central India US Gov Iowa
West US West Europe South India US DoD East
East US 2 East Asia West India US DoD Central
West US 2 Southeast Asia Canada Central China East
Central US Australia East Canada East China North
North Central US Australia Southeast Brazil South UK South
South Central US Japan West Korea Central Germany Central
West Central US Japan East US Gov Virginia Germany Northeast

Courtesy: Microsoft

If your Azure storage account location is not available in the above list, you can create a job and send it to the alternate location as specified in the tool while creating an Import job.

Next blogpost covers, step by step process of Azure Import/Export service/job.

#Azure: Step by step Azcopy


When an organization of any size looks at the cloud, data migration becomes focal point of each discussion. Available data transfer options can help you to achieve your goal. In command line methodologies Azcopy is the best tool to migrate reasonable amount of data. You may prefer this tool if you have hundreds of GB data to migrate using sufficient bandwidth. You can use this tool to copy or move data between a file system and a storage account or between storage account. This tool can be deployed on both Windows and Linux systems. It is built on .Net framework for Windows and .Net core framework for Linux. It leverages windows style command-line for windows and POSIX style command-line for Linux.

Let me explain, how to do it step by step on windows system.

First, download the latest version of Azcopy tool for Windows.

Once downloaded run the .msi file. Click on Next to continue installation.

Accept the license agreement and click on Next.

Define the destination folder and click on Next to continue.

Click on Install to begin the installation.

Click on Finish once installation completed successfully to exit the installation wizard.

Open “Microsoft Azure Storage command line” tool from the programs.

Now, look at the source and destination location and type. If I am copying data from internal filesystem to the cloud blob storage then local filesystem is my source and blob container in cloud storage account is going to be my destination.

Note down the location of source data.

Copy the URL of your blob container.

Copy the Access Key. You can find “Access keys” under setting in storage account.

Run the Azcopy command in following syntax: Azcopy /source:<source path> /dest:<destination path> /destkey:<Access key of destination blob> /s

You can monitor the copy activity.

If any error occurs during copy operations, you can monitor that as well.

Note: In the example below, to simulate an error scenario, I had tried to copy all blog posts along with this blog post on that I was working on. Therefore, you can see the same error description.

Another error was .tmp file. This .tmp file error, we can ignore.

Now, let me explain you that “how to perform retry option”. Run the same command and “Incomplete operation with same command line…” prompt enter Y to retry the operation for failed data. As you can observe that the filed operation of in-use file has completed successfully. However, we can ignore the .tmp file error.

Once you have copied all the data, go to the blob container and verify the same.

If you have high bandwidth internet connection or express route, you can move large amount of data as well using Azcopy but it is more relevant option for xyz GB of data. Here xyz represents the numbers.

#Azure : Data transfer


Cloud has become a prominent option for all kind of organizations. When any medium to large organization moves to the cloud, data transfer becomes a biggest challenge. To address this concern, Microsoft provides different types of data transfer options to the customers. Before you get into the details of data transfer options, answer the following questions:

  • How much data, we need to migrate?
  • What is going to be the frequency of data transfer?
  • Data source and destination locations, and respective data regulations?
  • Find the bottlenecks that may arise at the time of migration?
  • Do the cost, time and effort comparison between possible data migration types?

If you look from the Microsoft point of view, they have divided the data transfer into four major categories:

  • Physical data transfer
  • Data transfer using command line tools and APIs
  • Data transfer using graphical user interface
  • Data pipeline

Let me explain you briefly about each one of the data transfer methodology:

Physical data transfer: Widely used when you have large data sets to migrate. It could be leveraged for either one-time data migration activity or for less frequent data migration activity. For physical data transfer you can choose one data methodology based on the size.

  • Azure Import/Export: The Azure Import/Export can be used to transfer large amount of data using internal SATA HDDs or SSDs. By using this service, you can securely transfer data from on-premises to the cloud blob or file storage and vice-versa. When procuring drives for this service, don’t get confuse between SATA and SAS drives. Order SATA III drives as it is faster than older version of SATA drives and support speed of 6 Gbps.
  • Azure Data Box: Azure Data Box is an option to transfer very large amount of data, it is very similar to Azure Import/Export but avoids the hurdles of procuring, writing and sending multiple data disks. In this service, Microsoft provides you secure and reliable appliance to transfer data between on-premises and cloud blob and file storage. It is much easier than Azure Import/Export service as Microsoft takes the responsibility of end-to-end logistics.

Data transfer using command line tools and APIs: used when you have enough bandwidth available to migrate limited amount of data between on-premises and cloud blob and file storage. There are multiple tools available to perform this activity.

  • AzCopy: It is command line to tool to transfer data to and from Azure blob, file and table storage in fast, secure and reliable manner. You can install this tool on Windows or Linux machine to transfer data. It supports parallelism and the ability to resume copy operation when interrupted.
  • Azure CLI: It is a command line tool to manage Azure services and to upload data to Azure storage. Azure CLI doesn’t need any installation and configuration as it is available through Azure portal itself.
  • PowerShell: PowerShell is an alternative option for windows administrators to transfer data.

Data transfer using graphical user interface: is a most simpler way of transferring data between cloud on-premises. You have two options available to transfer data using graphical tools.

  • Azure Portal: Simplest way of exploring and uploading files to the Azure blob storage and data lake store but it has a limitation of exploring and uploading only file at a time.
  • Azure Storage Explorer: Azure storage explorer is a great option for GUI lovers, it provides a capability to manage, upload and download files through interactive interface for blobs, files, queues, tables and Azure Cosmos DBs objects. It also allows to manage data between blob storage, and between storage accounts.

Data Pipeline: used when you need to transfer data regularly.

  • Azure Data Factory: It is an option to transfer and transform data using data-driven workflows (a.k.a data pipeline) on a regular basis by leveraging orchestration or automation processes. It is a managed service to transfer data between Azure services, on-premises, or a combination of the two. The workflow can be created and scheduled based on your requirements. It can process and transform the data by leveraging compute services such as Azure HDInsight Hadoop, Spark, Azure Data Lake Analytics, and Azure Machine Learning.

Apart from the above core data transfer options, following are the list of tools that can be leveraged to transfer data within specific Azure services.